In a perfect world, this DIY closet kit would fit absolutely every closet out there. The reality though’¦ every closet is a different size. But, I believe that this plan can be easily adjusted to fit the needs of just about anyone who wants to tackle it. And, I’ll show you exactly what I mean!

The closet is built from three main components: the top shelf, the bottom shelf, and the shelf/drawer system that divides the sides. No matter the size of your closet, the shelf/drawer system never needs to changes sizes. The only parts that need to be adjusted are the top shelf and bottom shelf to fit the length of your closet. And, if you have an extra large closet, you can simply build two or more of the shelf/drawer systems to accommodate more storage!
For us, this process began as a simple hand-doodling on our way to go camping. With my sister-in-law moving in, we knew that a closet that looks liked this was simply not going to work.

After an initial showing to the husband, he approved the idea for the change, but told me that I should whip up a more technical drawing. So, I came up with this drawing, and slowly, through our process of building, we made tons of tweaks and it ended up looking like this’¦

Yes, I know’¦ it’s still not that technical, but it helped! This drawing served as our guide for the entire building process. And in the end, we had an amazingly useful and attractive product that we were very proud to showcase! Not to mention that it stored ALL of my sister-in-law’s stuff! Amazing!!!
For those of you looking for a simple, affordable, and effective closet solution, I decided to write a bit of tutorial so that you can build your own! So’¦ here it goes’¦
SUPPLY LIST:
- 3/4′ MDF (approximately 3 sheets)- we bought ours at Habitat for Humanity for $10 per sheet
- Curtain Rods
- Curtain Rod End Holders
- L-Brackets (2)
- Drawer Hardware
- Drawer Bump Stops (clear round things that stick on to prevent slamming)
- Euro Drawer Slides (3 sets- one set per drawer)
- Kreg Jig Pocket Hole System
- Screws
- Drill
- Table Saw
- Circular Saw
- If you have a finishing nailer, then using is helpful (so, finishing nails and nailer)
CUT LIST (FOR A 76′ WIDE CLOSET):
Center Shelf/Drawer System
- 1- 18’x34′ (frame- back)
- 2- 15’x70′ (frame- sides)
- 2- 15’x17.25′ (shelves)
- 2- 1.5’x17.25 (drawer spacers/dividers)
Bottom Shelf-
15’x76′
Top Shelf- 11’x76′
Additional Shelves (above middle rod and right-side bottom)
- 1- 15’x42.5′
- 2- 15’x16.5′
Drawers
- 3- 16’x13.25′ (drawer bottoms- 1/4 inch MDF works best for this.)
- 6- 14.25’x10′ (drawer fronts and backs)
- 6- 16.5’x10′ (drawer sides)
- 3- 18’x12′ (drawer faces)
Shelf Supports
- 3- 2’x42.5′
- 4- 2’x16.5
- 9- 2’x14.25′
- 2- 2’x10.25′
Rods-
cut to proper length by measuring your specific opening and then deducting the MDF and rod support.
HOW TO ASSEMBLE AND INSTALL
The most important thing in the whole build is the center shelf/drawer system. It is the foundation for the rest of the closet kit. So, start with that.
Assemble Shelf/Drawer System
TIP: For the greatest strength and security, we recommend using a pocket hole construction. It is easiest to use the Kreg Jig to accomplish your pocket holes and assembly.
Assembly
- Take your three ‘œframe pieces’ and assemble them, either by screwing or using the Kreg Jig system. Start with the back and attach the two side pieces to the sides of the back
- Install the shelves
- Install the drawer spacers/dividers
- Attach drawer rails in proper spaces
Installation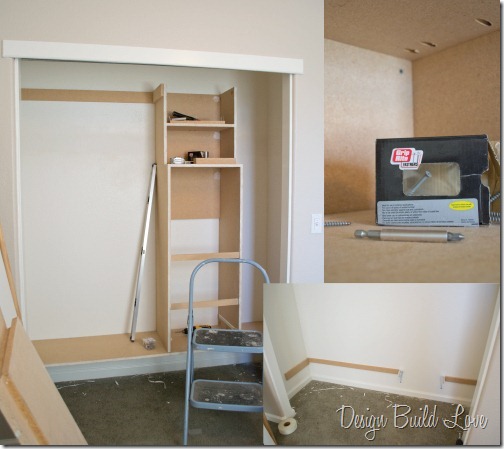
- Attach shelf supports and L-brackets for bottom shelf
- Install bottom shelf by finish-nailing to supports
- Find the wall studs for mounting the box
- Set the box on bottom shelf
- Using proper length of screws, screw box into studs (we used 6 screws for attaching it to the wall)
- Fill screw holes with putty
Assemble Drawers
TIP: Using a router to create a ‘œdrawer bottom insert’ creates a cleaner, more professional look. This is the option we chose, but you can also simply screw the bottom on.

- Attach three sides together using finishing nailer and nails
- Slide bottom into the routered track
- Attach fourth side using finishing nails
- Once drawer is fully assembled, screw on drawer face from the inside of the drawer out towards the drawer face
- Attach rail to side of drawer.
- Test fit of drawer in box and adjust rails accordingly
- Apply rubber stoppers to back of drawer faces
- Install hardware on each drawer
Install Shelves
- Attach all shelf supports to all using finishing nailer
- Attach shelves to supports using finishing nailer
Install Rods
TIP: staining your wooden rod really dresses up a closet without a lot of effort. Simply stain, and you’re done!
- Measure depth for your rod based on how big your hangers are
- Install rod end holders on MDF shelf support
- Slide rod inside support
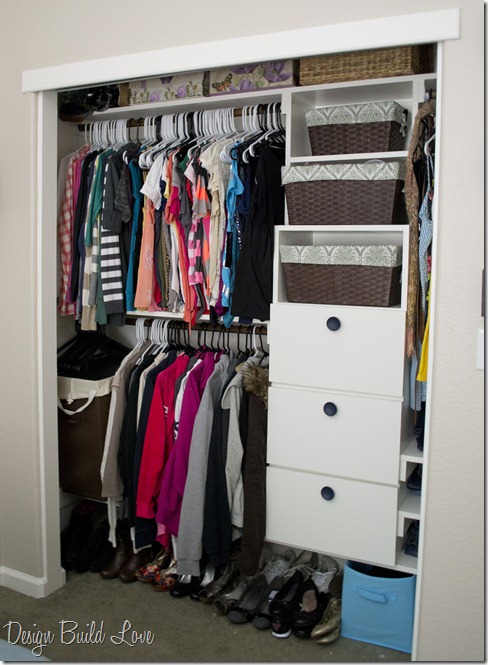
FULLY STUFFED CLOSET KIT (REAL PICS)
After Julia got all moved in and stuffed the closet, we were all three really surprised at exactly how much this closet held!!! Most of her clothes are hanging, but she used baskets on the shelves, stored her shoes below the closet kit, place her hamper on one of the shelves, utilized the additional ‘œsupposed-to-be shoe storage’ shelves for her folded jeans, and lined the top shelf with baskets and boxes for extra, concealed, long-term storage. This girl is smart!
Now, you’ve seen how the closet looks all stuffed! Why would I show you a real picture, you ask? I want you to know that, around here, we don’t just build things to be pretty. FUNCTION IS A MUST! And, this functions!